
|
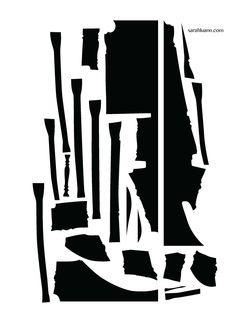
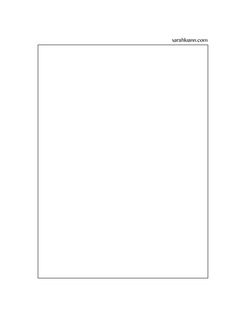
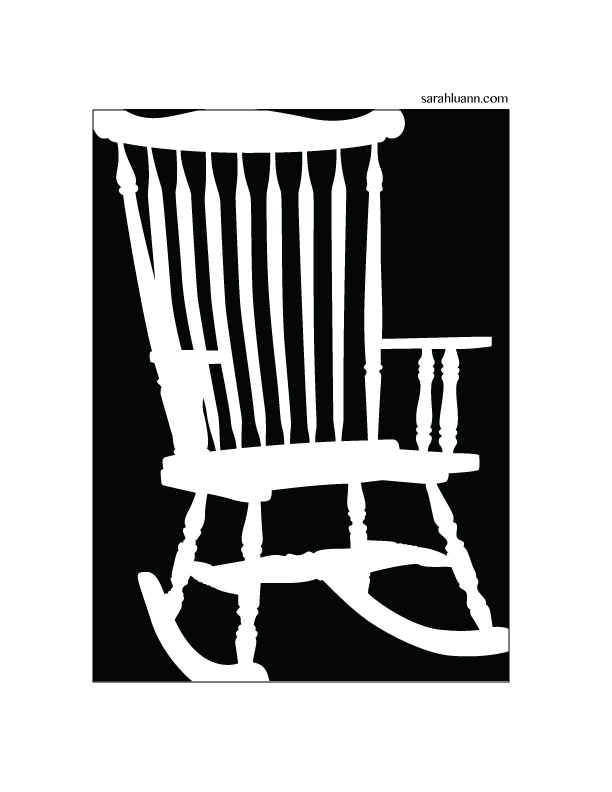
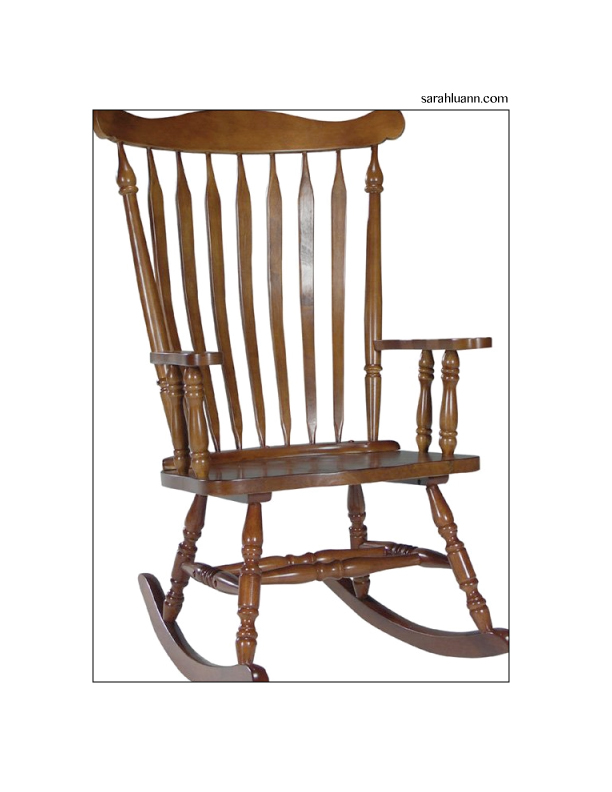
Happy Labor Day! Last week, I started a project I've been thinking about for awhile now. Each Monday, I'll be posting on my blog a basic drawing exercise that can help you to learn to see and draw more accurately. On Friday, I'll post pictures of the sketches I made. Last week's assignment was on pre-instruction drawings. I won't be posting mine here for a couple of reasons--if they were here, I would look back at them (I probably look at my blog more than anybody else), and part of the fun of doing pre-instruction drawings is being surprised at your progress when you look back at them after weeks of work. Second, since I have already had a LOT of art instruction, I don't think it would be fair to show mine as examples of what a real drawing done before any art instruction would look like. I think I may post them at the end of this series, though, to see if I made any progress through doing these exercises. I want to introduce the exercise by doing a sort of "in class" activity. I'm going to intentionally leave spaces you'll have to scroll past to see the final "solution". Am I being vague enough? I did this activity with a group of twelve year old girls last week, and it took about 45 minutes start to finish--so do this when you have a little chunk of time and don't rush through it. To start this activity, print out these three pages. They need to be in proportion for the activity to work, so don't fiddle around with the printing size options (or if you do, do it the same for all three.)
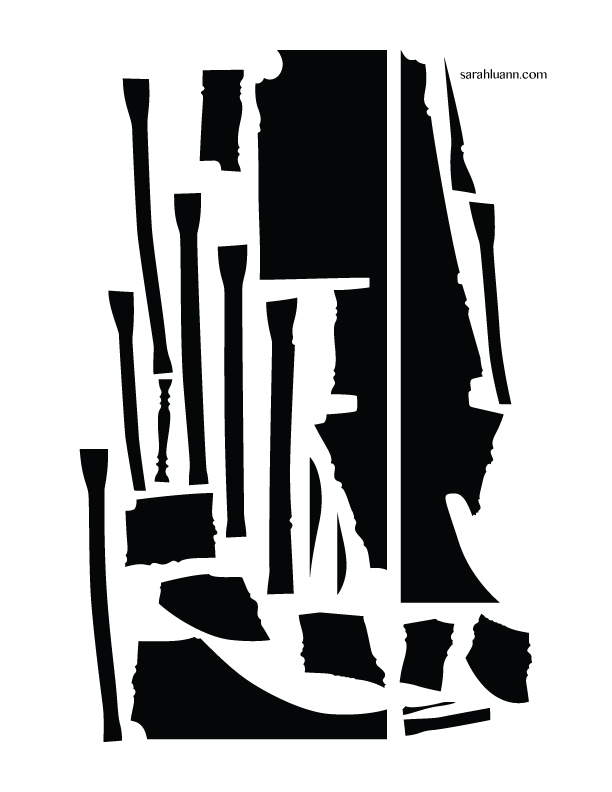
Now you have all you need to do this activity. You know its a puzzle, you have your pieces, your frame, and your reference picture. Ready.... Go. You probably figured out by now that this is not a jigsaw puzzle. What kind of puzzle IS it? That is for you to figure out. Some people see the solution quicker than others. If you're feeling stuck, here are a few hints. I'll make the text white so you have to highlight it to see it. 1. Start with the corners. 2. None of the black pieces will touch each other. 3. See if you can line up a black piece with one of the white spaces in the chair picture. Then, place it in that same place in your frame. Think you've got it? Here is the solution:
I call this a Negative Space puzzle. I got the idea for it by combining a couple of activities suggested in Betty Edward's book Drawing on the Right Side of the Brain, though this specific activity is my own way of showing the concept. And what concept is that, exactly? And how does a puzzle help me learn to draw? We're getting to that. Actually, it's the next part of the activity. I want to take your puzzle pieces off of your puzzle frame. Place your frame and your reference picture side by side. Now, using the picture of the chair as reference, draw where each of the puzzle pieces should be. DO NOT think to yourself, "I am drawing a chair." Instead, think, "I am drawing those puzzle pieces." Think of those empty pieces as the actual physical thing you are drawing--think of the real puzzle piece that you held in your hand. That is what you are drawing. To keep yourself thinking about the pieces instead of the chair, it can help you to turn your picture upside-down and draw it that way. Something else that might help you think this way is to color in the puzzle piece spaces, and leave the chair space blank. Ready, go. How does it look? Many people who are introduced to this concept for the first time are surprised at how much more accurate their drawings are. How can such an odd way of thinking make your drawing more accurate? It seems like thinking about the chair should make your drawing look more like a chair, but that isn't how it works. Before we learn to draw, we often think in symbols. Symbols such as these: 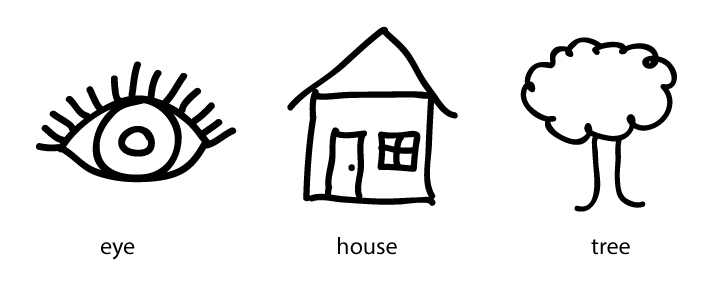 The thing is, nobody's eye is actually a football shape with a circle in the middle. Nobody's house is a square with a triangle on top. There isn't a tree that is actually a puff ball with a pole holding it up. These are simplified shapes that represent the idea of the thing, but they aren't what these things actually, realistically look like.
Don't get me wrong, these symbols can be useful--but not when you want to learn to actually understand what you see and draw it accurately. To do that, you have to move past the symbol and see what you are actually drawing. You need to stop thinking "chair" and start thinking "a group of specific abstract shapes". By focusing on where the chair isn't--the negative spaces, our puzzle pieces--we see more accurately what shape the chair itself takes, rather than simplifying it into a symbol. Exercise: Negative Space Drawing Goal/Focus: Drawing accuracy, seeing past the symbol Materials: Pencil, eraser, sketchbook Assignment: For at least 20 minutes a day, draw in your sketchbook. Do these drawings from life. Draw the negative space around an object or group of objects. Some ideas of good subjects for negative space drawings might be: Furniture, like a chair, table, or stool Plants or trees Stacks or groups of things--a stack of books, a bowl of fruit Other somewhat complex objects with overlapping pieces--a bike, a lamp, a musical instrument Don't limit yourself to these ideas--draw what you want. But as you draw, focus on drawing the spaces where your subject is NOT. Think of the empty spaces as being the actual subject you are drawing. Remember the puzzle pieces--think of them as an actual physical shape you can hold. Have fun.
0 Comments
Leave a Reply. |
Your email will not be shared with anyone. It will only be used for updates from me, and you can unsubscribe at any time.
Categories
All
|
||||||||||||||||

 RSS Feed