Everybody who follows me on facebook is probably sick of my sourdough pictures. I keep posting them. I can't help it--I'm so excited about what I've learned. I've really come a long way from my first small, flat, brick-like, much-too-sour loaf. Was that only a couple months ago? I have now learned to harness the powers of organisms too small to see to make something beautiful and delicious! Its basically like a superpower. I thought, Wouldn't that be great on a shirt? 
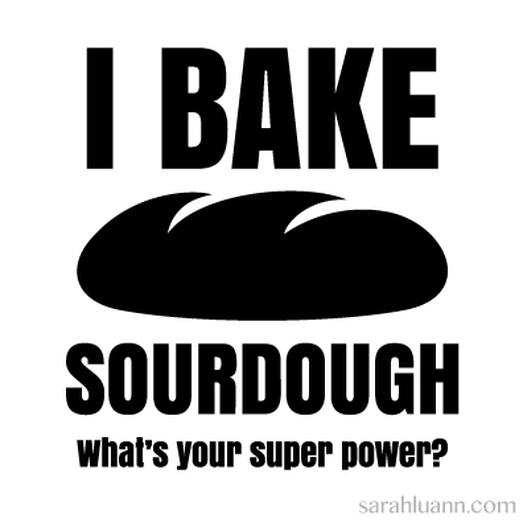
Click here to get it on a shirt. Or if that link doesn't work, copy/paste this:
http://society6.com/product/i-bake-sourdough-whats-your-superpower_vneck-tshirt#37=297&39=329&38=309 The idea didn't stop there, though. I thought, there are a whole lot of skills that take a lot of time and study to develop. Skills that are amazing and difficult to understand. So, why not do a whole series of super power images? Thats what I did. I have created designs for 10 real-life "superpowers", most of which I don't actually have, but wish I did. I think that the people who do should be able to show off their skills with an awesome t-shirt or poster. I'm not the first to have this idea. A quick internet search shows me a few shirts saying "I'm a mom, whats your superpower?" and "I'm a dad, whats your superpower?" and a few others--teacher, nurse, firefighter etc. Those are all cool, but I wanted to focus on skill sets that aren't necessarily an occupation, or whatever you call being a mom or a dad. I created designs for "superpowers" which I haven't already seen on a similar shirt--which isn't to say they don't exist, just that I haven't seen them. And, I wanted them to be well designed--most of those I saw were just illustrated with clipart, if at all. I wasn't too jazzed about the font choices either. And the overall design wasn't amazing either. Yeah, sometimes I can be an art snob. So, this was also an artistic challenge for myself. I wanted to create a set of images that hang together and look good. My criteria were these:
I'll be posting 1 each weekday starting today, until all 10 are posted. Stay tuned!
0 Comments
My facebook friends may be getting sick of me posting pictures of my bread. But I just can't get over how beautiful and delicious is. And I made it. I'll try and control my picture posting though. After I put these here. Needless to say, my bread baking may be somewhat better than my photography skills. I'm still working on both. Have a question about bread baking? Not sure if your starter is starting? Want to know the best way to get the softest/crunchiest/whatever-est bread? The people on this site know better than me. And they are eager to share their knowledge and expertise. Its like this great little corner of the internet where the goal is to help everyone make the best bread possible. Go take a look. Ok, I'm good. No more pictures for the rest of the post. At least, not of my bread. I thought I'd post a few more things I've learned that have brought me to this point--things I really feel have taken my breads from good to great. TheFreshLoaf.com![]() I didn't get a big fancy scale. In fact, this is the scale I bought. Yeah, its cheap, but it gets the job done. Its small and takes up hardly any space in the cupboard. Best of all, it makes it so much easier to see just how much of each ingredient you are putting in your bread. Which seems weird coming from me, because anyone who has seen me cook knows that I see a recipe as a set of nice ideas, but I'm going to do my own thing, thanks. This is the funny thing--the scale doesn't actually change that. The bread in that last picture--the one with the nice golden crust and big holes--was made in my classic throw-it-all-in-a-bowl fashion (Some white wheat flour.... and how about some red wheat... and then some bread flour... and that left over potato water...) The only difference is, measured everything I put in, and used those measurements to make an educated decision about what else to throw in. Easy. And what were those educated guesses based on? Switch to weight measurements, instead of volume 1:2:3 Sourdough This is my kind of recipe. From what I can tell it originated here, and now is apparently used by sourdough bakers all over. To make your dough, you take (in weight, not volume): 1 part starter 2 parts water/liquid (milk, potato water, etc.) 3 parts flour/dry ingredients And then you add 2% of the weight of your flour in salt. So your basic sourdough recipe would look something like this: 100g starter 200g water 300g flour 6g salt. Thats it! Do you realize how awesome this is? Its my new favorite thing. I put it to the test yesterday, with three different types of flour and mashed potato and potato water and plain water all making up parts of the recipe. (Those little lumps in the third picture? Yep. Its potato.) I've found that personally I like my dough a bit wetter, so I put closer to 220 g water in, so the ratio is more like 1:2.2:3 (Darling its better, when dough is wetter, take it from meeeeee!). And it turned out amazing--crunchy crust, soft airy crumb, delicious plain or with just a bit of butter. Which brings me to another new favorite thing: Using Potato Water and/or Mashed Potato as part of your liquid ![]() Which really shouldn't have surprised me, considering that growing up, I liked when my mom got us potato bread almost as much as when she bought sourdough. I first tried it after stumbling across this video, and I'm not going back. Its not at all hard to chop up a potato and boil it before putting your dough together. The potato makes your baked bread nice and soft in the middle, while also letting the outer crust stay nice and crispy. Adding butter or oil would make your whole loaf soft, including the crust--which I guess is fine, depending what you're going for. I also really love the flavor of the potato--yes, its subtle, but definitely there. Try it. Its worth it. Stretch and Fold vs. Kneading Of course I knew what kneading is, but only when I started learning about artisan sourdough did I encounter a method called "stretch and fold". Here is a quick video showing the technique. The video series I linked to above (the one with the potato water) also uses stretch-and-fold in a slightly different way. Both kneading and stretch-and-fold are good ways to develop gluten in your dough. I've tried both, but I'm no expert. From my limited experience and reading, Stretch-and-fold is good when:
I've done both. When kneading, it was nice to actually feel the dough change texture in my hands. Stretch-and-fold required less hands-on time, and the dough seemed to do its own work for me. Both have worked for me. Do what works for you. AutolyseWeird word, huh? To me, it looks like it should rhyme with "eyes" but in videos I've watched on baking, it usually seems to rhyme most often with "lease".
Here is a more detailed post on what it means. In practice, what I've done is mix my starter, flour, and most of my water and let it sit for awhile--say, 30 mins--then, dissolve the salt in the remaining water and knead/stretch-and-fold it in. Easy. It seems to especially help with whole wheat flours, which soak up more water. Thats all I've got for today. Because I'm hungry and want another piece of my bread. Go bake your own. ;-) Life goes on, and I continue to find delicious things to make with my sourdough starter. The problem is, there are only two of us, and we only eat so much bread. We have taken what opportunities we can to give food away to people. The problem is, we're still really new here and we just plain don't know that many people to give stuff to. The good news is, sourdough starter isn't only good for bread! These are a few things I tried making that were not bread, and they turned out amazing. I will definitely be re-visiting these recipes in the future. Sourdough batter for Fish 'n Chips or Onion Rings My inspiration was found here: http://www.thefreshloaf.com/node/12550/sourdough-onion-rings The first time I tried this I made home made Fish 'n Chips and, man, were they good. Then just the other day, I made home made onion rings. They were amazing, again. I made one major change to the recipe as given in the link above. (Well, aside from not really measuring anything, but then again, I hardly ever do.) I did not use soda water in my batter. It's just not something I keep around, and not something I wanted to buy just for one recipe. Instead, I thinned out the starter with water until it looked about the consistency of cake batter and threw in a tiny bit of baking soda. The batter fried up beautifully, it was fluffy and crunchy and amazing. In fact, it was so amazing that neither time that I used this recipe did I pause long enough between bites to snap a picture of the food. But this is definitely something I'll be trying again, so maybe next time. Another fun thing we did with our onion rings was do a sort of mix-your-own-sauce buffet. We got out everything in the fridge or cupboards that might taste nice and mixed up our own sauce. Mine was mostly ketchup, with some Worcestershire sause, lemon juice, seasoned salt, and a dash of cayenne. Mr. Perkins did ketchup and mayonnaise with Worcestershire sauce and Creole seasoning. We both thought ours was the best. Sourdough Beignets I first tried beignets when my parents brought a mix home after a trip to New Orleans. They're in the same family as Utah/Mormon Scones, Navajo Fry Bread, or Fried Dough. The main thing that sets beignets apart would be that they have a little bit more sugar, and therefore get a little bit more brown when you fry them. Nobody would be surprised to know that I have been finding ALL the delicious-looking sourdough recipes I can recently. I stumbled across the Sourdough Surprises blog, which gives bakers a category to make something each month with their starter. This month it was beignets. Take a look at these beauties. And believe you me, they tasted as good as they looked. Instead of the classic powdered sugar, we topped them with coconut creme (our new favorite sweet topping) and didn't feel bad about it one bit. I got my recipe from here: http://benstarr.com/recipes/sourdough-beignets/ And good news for you non-sourdough people out there--it also gives instructions for making them without a starter, if you wish. They won't have the sourdough tang, but they'll still be dang good. Sourdough Brownies Rich, sweet, and tangy. Soooooo good. This is where I got my recipe: http://www.wildyeastblog.com/sourdough-brownies/ I didn't have bittersweet chocolate, so I used milk chocolate and reduced the sugar. It turned out just great. And yes, the recipe uses grams instead of cups. So if you really want to try them I can tell you this much: most chocolate packages will have grams right next to the ounces. My package of chocolate chips was 326 grams, so I ended up using most of the package. 2 cubes of butter weighed in at just under 226 grams (no wonder these were so rich ;-), so I added a little scoop of coconut oil to make up the difference, which probably wasn't even necessary. There are online calculators that can help you to convert the measurements of the other ingredients. So there you have it. Our favorite non-bread sourdough recipes. Meanwhile, there are still only just two of us, and I still bake a whole lot of bread with my starter. So I'm now looking for recipes using old bread or breadcrumbs, and I'll do a roundup of those when I've found some I like. Saturday is sourdough baking day! Today, we're trying cinnamon rolls.
The dough is rising now. But before you let it rise, ya gotta knead it... No, I didn't have time to make the most beautifully posed picture, with the nice soft lighting, and the artistic arrangement, or any of that. You see, I was too busy eating three whole pieces of this loaf covered in butter.
It was so. Good. I've come a long way from my brick of a couple weeks ago, and I wanted to share a couple more things I've learned since my last post about sourdough. Let your dough stay nice and wet and sticky. Put just enough flour to get it to the point where it would like to stick to itself a little bit more than to the bowl--then stop adding flour. I used to read the description in many recipes that you needed the dough to "clean the bowl" and thought that my dough had to be a ball that wouldn't stick to anything but itself, or something. I have since learned differently. I actually figured this one out by accident. I had just enough flour in the house at the time to make one loaf of bread, and when I added the last of my flour it still looked stickier than I was used to making my dough. And I said, well, that's the last of the flour, I guess it will have to be good enough. And it was. Who knew that I was making my dough too dry all this time? My bread before wasn't bad, but it wasn't quite as soft or fluffy as I'd like. Now I know why. You will be more aware of subtle changes in your dough's texture if you knead it by hand, rather than using a mixer. Also, kneading is fun. Maybe nobody but me remembers this, but one of my goals this year was to find types of exercise that I would, you know... actually do. And dough kneading is now the first on that list. I love the texture of the dough, and feeling it gradually grow stronger and more elastic. And I've found that the difference between dough that will pass the windowpane test and won't could be the difference of just a few fold-and-pushes. So even though I have a kitchen aid that could do the kneading for me, so far I've done it all by hand. I'll probably be singing my kitchen aid's praises once there are little Perkinses running around wreaking havoc, but while its just me and Mr. Perkins, I like getting my hands doughy. You can knead your dough on a floured surface, or on a watered surface, or on an oiled surface. Or you can be hard core like me and knead it without any of those things. So, that time I ran out of flour? Obviously I still didn't have any when it came time to knead. But since the dough was already stickier than I was used to I didn't want to make it even more sticky by adding water, or oil. So I decided to just slap it on the counter and see what happened. And you know what? It made surprisingly little mess, requiring cleanup probably comparable to flour or water or oil. (Of course, at that point I still didn't know how my stickier-than-usual loaf was going to turn out, so I had a sort of "well if its already ruined, who cares?" attitude.) Now, its possible that this was because the point at which I've now trained myself to stop adding flour (with about three batches of dough, but you know, its a start) is exactly at the point where the balance of flour and water is just right. Other bakers may train themselves to take it out a bit more sticky and need to knead (haha) a bit more flour into it to get the ratios right. Or others might overdo the flour a bit and so knead in some water. Or I could just be crazy and making all this up and its not a big deal. Which basically brings me to the last point, which is this: Trial and error, my friends. To learn anything, ya gotta get your hands dirty (doughy?) and just try things out. Because there are so many variables in bread making, especially sourdough baking, that reading really can't get you that far. You just have to try things out and see what works for you. Which is hard when its food and you don't want to waste it or ruin it. But that is part of learning. Thats all for now. :-) ![]() So its no secret that I've been experimenting with making sourdough bread. And today, I have my first edible (delicious!) batch of loaves, so I thought I'd just talk about my experience so far and share what I've learned. There are a whole lot of people who know much more than I do on the subject, so mainly this post is going to give a few links to pages other people have put together, and give a few comments on how they have been helpful to me. Also to ramble a bit. Because this is my blog and I can. Here I go. Growing up I always liked sourdough. With most breads, I had to toast it AND butter it AND smother it in jam in order to actually enjoy eating it. Sourdough toast was my favorite, however, and all it needed was a bit of butter to taste delicious. I never really knew what it was that made sourdough sour and didn't worry about it. I remember very clearly that once dad mentioned he had a friend with some "sourdough starter" he could share with us, but I never asked what that meant or found out any more about it. Fast forward to now. We recently moved across the country and have been trying to figure out the area. We've been trying different restaurants and stores, trying to find things we like. (We haven't managed to find a restaurant out here that we especially like, unfortunately.) Once, when Richard was getting groceries for us, he grabbed a loaf of bread for us to try--a multi-grain sourdough bread. It was delicious. Amazingly so. It has been our favorite bread to buy since then. After discovering that bread, I thought that it might be cool to make some sourdough at home, and tried looking up some recipes. When I found out I'd have to leave out flour and water and let little things grow in it, my interest was lost. It sounded kind of gross, and also like a lot of work, and we had a grocery store a couple blocks away that would sell us delicious multi-grain sourdough bread with far less effort. Another time when we were getting groceries, Rich convinced me to pick up some whole wheat flour along with my accustomed all-purpose, because he actually likes the flavor of whole wheat. So then I started to try to bake things with it for him, with varied amounts of success. Time passed. I had mentioned to my mom that we had found this amazingly delicious multi-grain sourdough bread, because I thought she'd appreciate that I actually liked multi-grain something. Which she did. She also mentioned to my grandma that I loved this sourdough bread, and my grandma decided that that must mean that I wanted some of her starter. Which I did, I just didn't know it at the time. Now, last I'd heard my grandma had a gluten sensitivity (or allergy, or something). And now she was all excited about making bread? That's weird. Turns out that (real) sourdough can break down the gluten (or something?) so that it doesn't cause problems for people with certain types of gluten sensitivity. Who knew? So when we went home for Christmas, Grandma was all excited to give me some of her starter and show me this book about baking sourdough ("The Art of Baking with Natural Yeast" by Melissa Richardson and Caleb Warnock). And I thought, well, I guess I might as well take a look at this book since she went to all this effort to bring it to me. (And, well, you know me and books.) So I opened it up and started reading from the beginning, even though this sourdough thing seemed like a whole lot of work... and I got interested despite myself. This natural yeast stuff was actually pretty cool. And super healthy to boot. (Of course it was. Grandma likes it.) So I took the starter home (still a bit skeptical) and started feeding it. And now I finally have a nice batch of sourdough loaves to munch on! I already ate 3 pieces. I kind of want another one. (And now Rich came home and we finished off the first loaf. Fortunately there is more.) Here is what I've learned so far:Leaving water out uncovered to let the chlorine dissipate actually works.
There are so many sources on this one, and I don't remember where I first read it, but I've seen it on multiple sites about sourdough. Chlorine is put in water to kill all the little things living in it. This is a problem, because you want to encourage things to live in it. So if you live somewhere (like maybe upstate New York ;-) where they put a lot of chlorine in the water when they clean it, try leaving it out on the counter overnight and see if your starter perks up when you use that water--mine did. Now, I just keep a tall glass of water out on the counter by my starter, and re-fill it each time I feed. Your starter won't double (or even grow much at all) if it is too thin. Err on the side of too much flour if you're not sure how much to put. My main source for this is this blog post (by one of the authors of the book Grandma showed me). For awhile I was making my starter too thin and, even though it was doing a bit better with my de-chlorinated water, it still wasn't rising as much as it should. I think there were two things that led me to do it wrong. First was the description of the correct consistency as being "like pancake batter". This may be the fault of my preferring thin pancakes, but when my starter looked like pancake batter it was too thin and would barely rise. The other misleading thing for me was the "equal parts flour and water" instruction. Most sites make it clear that it should be equal WEIGHT not equal VOLUME. But I don't have a scale in my kitchen and I just fed my starter using my measuring cups. When you use measuring cups, keep in mind that you'll put a greater volume of flour than of water--so if you put in 1 cup water, you might put 1 1/3 cup flour (give or take). When baking with whole wheat flour instead of white all-purpose flour, use slightly less flour and let the dough rest for 20-30 minutes before kneading it. I made a couple batches of mediocre, heavy (commercially yeasted) whole wheat rolls before figuring this one out. Well, I didn't figure it out--I found this awesome blog post, with lots of great pictures, comparing rolls and breads made with all white flour, all wheat flour, and half white/half wheat flour. There is a lot of great info on that post, but the summary is this: when converting a white flour recipe to wheat flour, let the dough rest for half an hour before kneading it to give the flour time to soak in the moisture and it will rise like it should. If you don't want to do pure whole wheat, you can do half white/half wheat and you don't need to alter the recipe or wait to knead the dough. When you're just starting with sourdough and trying to figure things out, keep your starter on the counter. Then, once you've figured things out and you've decided to bake less frequently, keep your starter in the fridge. I don't have a source for this one, I just made it up. I kind of did it by accident, but its worked out really well for me. When my starter was barely rising I decided to keep a bit of it in a glass on the counter and see if it would do better in the warmth. This happened pretty early on in my starter-keeping, and has now been going on for about two weeks. All my learning and progress and baking so far has been done with my counter starter--I've fed my fridge starter, but haven't really done much with it. Why do I suggest doing this? Well, think about it. You're all excited to develop this new skill set and figure this sourdough thing out. Now, if you're like me, excitement for a new thing sticks around for about as long as that thing is new--a few weeks at most. Since I've only had my starter two weeks, lets use that as an example. In two weeks, you would feed a fridge starter 2-4 times (depending what kind of schedule you are following--once weekly or twice weekly) In two weeks, you would feed a counter starter 14-28 times (again, depending on your feeding schedule). That is a whole lot more times! I would barely be figuring out the chlorine thing or the thickness thing I mentioned earlier if I was only on my fourth feeding of my starter. But since I've been keeping a starter on the counter, I've fed it more than twenty times, and I've had plenty of times to get it wrong and try new things and see what works. I've been able to do this when this is still new and exciting, rather than waiting a whole 'nother week to see if it will work, and not being able to bake bread until this sourdough thing has already gotten frustrating and old. Its also gotten me used to thinking about my starter more often because I've been able to keep it out where I'll see it any time I'm in the kitchen. And no, I haven't moved my counter starter to the fridge yet, I've just fed the fridge one on schedule--using the things I learned from feeding my counter starter to help it, and it has responded similarly. From everything I've read, a counter starter will take a little while to get used to being in the fridge, but shouldn't have big problems. Or you could do it like I did and keep one on the counter and one in the fridge. Whatever works for you. Because of the longer rising time of sourdough, you really need to cover it well or grease the outside of your dough so that the outside doesn't harden. If it hardens, it will form a hard shell that will keep your dough from rising. Learned from experience. I've found a lot of other helpful sites and recipes to try, which I've been collecting on my sourdough pinterest page. I'll continue to add to that as I learn more about sourdough. Thats it for now. When I figure more things out I'll let you know :-). |
Your email will not be shared with anyone. It will only be used for updates from me, and you can unsubscribe at any time.
Want a Print?
Take a look at my print shop on INPRNT.com Categories
All
Archives
September 2020
|