illustrated by Sarah LuAnn
  • Portfolio
    • Picture Books
    • Covers
    • Middle Grade
    • Comics
    • Maps
    • Stand-alone images and prints
    • Cricut Cartridges
  • Art Classes
    • Drawing Fundamentals
    • Beginning Painting
  • Prints
  • About Me
  • Contact
  • Blog
    • Dummy Worksheets
  • Portfolio
    • Picture Books
    • Covers
    • Middle Grade
    • Comics
    • Maps
    • Stand-alone images and prints
    • Cricut Cartridges
  • Art Classes
    • Drawing Fundamentals
    • Beginning Painting
  • Prints
  • About Me
  • Contact
  • Blog
    • Dummy Worksheets

How to assemble a heart box. 

1/23/2015

0 Comments

 
Picture
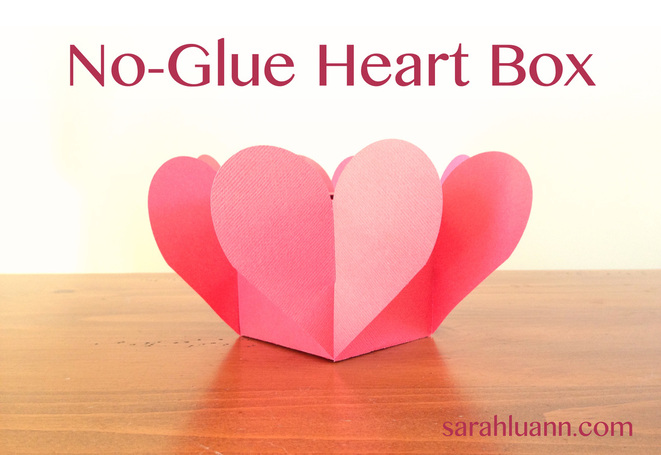
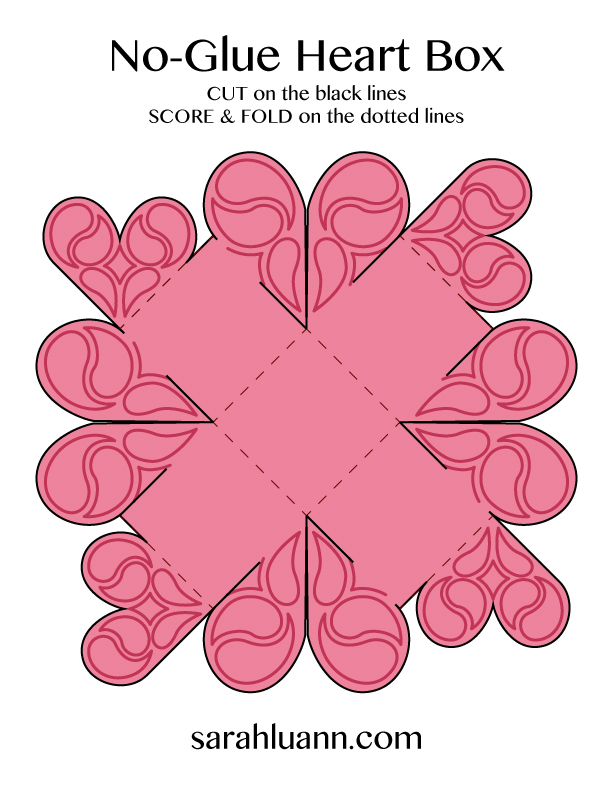
Awhile ago I said I was going to figure out a way to explain how to put together my heart box. And while it's really simple, I didn't know how to do it with images alone. So, I tried a video. Its not a very good one, but it works? Maybe.

You can print the files at the bottom and cut them out, then watch the video. The video starts with a box that is all cut out.
Picture
heartboxprintbw.jpg
File Size: 83 kb
File Type: jpg
Download File

Picture
heartboxprintcolor.jpg
File Size: 201 kb
File Type: jpg
Download File

0 Comments

Heart Card

1/14/2015

1 Comment

 
You know those paper heart baskets I posted awhile ago? Part of the reason I bothered to put that together was so it would stop bothering me. The concept had been rolling around in my head for weeks, and I thought if I actually made it and tried it out and made sure it worked, then I could forget about it. So, I made the paper heart baskets and said, I'm done.

Well, since I made and tested one thing using interlocking hearts, my brain decided to go crazy and think up more. Because its uncooperative like that.

So. I made a card, which is only a slightly altered form of a couple cards I've seen on pinterest, here and here. But after I made it, I thought, wow, I could make a cool box using this.

But right now you only get to see the card because I'm still trying to figure out the best way to explain how to put the box together. Because it's actually very simple and requires absolutely zero glue. Yep. And its actually really simple to put together, once you know the trick.

Anyway. All you get is the heart card for now. Knock yourself out.

Oh, and Happy Valentines Day.
Picture
Picture
cardprint.jpg
File Size: 52 kb
File Type: jpg
Download File

1 Comment

Ornament Painting

12/31/2014

0 Comments

 
Awhile back I made a fold and cut ornament... which I never posted or gave instructions for. Eventually I might.

And then I thought, thats a simple thing to paint. It would be good to start up again with something simple.

So, I painted it.

It was a good reminder of how much I love painting, and how much I miss it. And how terribly, horribly, completely rusty I am at it.

I started it one night in November and never got back to it until last night, when I decided to be done with it. Not because its the best it can be and completely finished, but because it served its purpose--it was a reason to get the paints out, and to remember how fun painting is, and how hard.

Here is how it looked, at various points in its life. I noticed too late that when I held the iphone too close to the painting it made the whole picture look cold, with a sort of grey-blue cast over the whole thing. Something to watch for next time.

Picture
Picture
Picture
Picture
Picture
0 Comments

Designing snowflakes

11/28/2014

1 Comment

 
Picture
Ok, you've folded your snowflake, either with 5 points , 6 points, or 7 points.

Now what?

Now you start cutting like crazy is what! Have fun and be creative!

As I said before, I am NOT going to give you a snowflake pattern, because I believe that that would be getting in the way of your fun and creativity. Besides, if you wanted snowflakes designed by me, you could just buy the Holiday Snowflakes Cricut Cartridge. You're cutting snowflakes by hand--make it personal and unique!

If you're still a little hesitant, here are some ideas of how to design a cool looking snowflake. This is most definitely not the only way--just one way.

Use a pencil and draw LIGHTLY so its easier to erase from your final snowflake. I drew dark so you could see.
Take your prepared little folded snowflake wedge shape and draw a few lines on it. I'd say somewhere from 2-5, but you can do more if you really like cutting. Straight lines are easier to cut, but curved shapes are fun too.

Make sure they meet these criteria:

-All the lines are somehow connected to the others
-At least one of the lines touches each of the two folds

That's it. Here are a few I did:
Picture
Draw lines paralleling the ones you already made, to make a thicker shape.
Picture
Cut along the outer lines until you've got your shape cut out.
Picture
Picture
Open it up to see what you've created!
Picture
Thats not the only way to make a cool snowflake. Here are some other things you might want to try:

-Use the method above, but make the line widths vary--thick on one end and thin on the other, or maybe thick in the center and thin in the sides... lots of options!
-Use the same criteria as above, but with shapes instead of lines. Try circles, squares, triangles, stars, whatever.
-Remember, symmetry is your friend! Since we're working with folded paper, if you put the center of a symmetrical image on the fold, you'll get a whole one when you cut it out and open it up. Hearts, stars, snowmen, trees, leaves, people--so many symmetrical things!
-If you want a challenge, try writing a word and cutting it out. The same criteria as above still apply--all the letters must connect (cursive can be helpful here) and your design must touch each of the folded edges at least once.


I think its fun to play with the shapes created from the center of snowflakes you've already cut out.
Look at the two snowflakes in this picture--the smaller one is made from the piece left behind when the center was cut out of the larger one. Fun, right? I also like having various sizes of snowflakes, which looks more interesting.
Picture
Have other ideas or suggestions? Put them in the comments! Also, show us what cool snowflakes you made with these ideas.
1 Comment

Folding a 7 pointed snowflake

11/28/2014

1 Comment

 
You've folded one with 6 points, and you've folded one with 5 points. (No, really. Do those first.) Now, you want a 7 pointed snowflake!
Picture


We'll start out just the same as we did for the other two.
Fold your 8 1/2 x 11 paper in half.
Picture
Picture
Picture
Find the center of the fold.
Picture
Picture
Now we really get started.

Fold up the corner of your paper and fold to form two angles, one 25.7 ISH degrees (180/7), and the other 77.1 ISH degrees ([180/7]x3)-- that is, the big angle is 3 times as wide as the small one. Not only do we have the thickness of the paper throwing our angles off, but you just have a whole lotta numbers after the decimals.

You can print and cut out a pattern here if you want some help getting the right angles.

Picture
Fold up the other corner against the edge of the fold you just made. Flip it over.
Picture
Picture
Fold back along the edge of your last fold. (Again, not sure how to word this--look at the picture.)
Picture
Flip it over and fold it in half. Cut off the top at the blue lines.
Picture
Picture
Here are some ideas on designing snowflakes, if you're interested.

I'd love to see your cool 7 pointed snowflakes. If you want to show us what you've made, put a link in the comments!
1 Comment

Folding a 5 pointed snowflake

11/28/2014

3 Comments

 
Picture
    So, you've folded a 6 pointed snowflake, and you want to try something a little bit harder. (And really, I would suggest doing at least one 6 pointed snowflake before trying this one, because this one is just a tiny bit harder.)


So, here we go--a 5 pointed snowflake.

We start with the same few steps as the 6 pointed snowflake. Fold your 8 1/2 x 11 paper in half "hamburger style".
Picture
Picture
Picture
Next, Find the center of the fold.
Picture
Picture
Here's where it starts getting exciting. Fold up the corner of your paper (with the end of the fold at that little crease you made) to form two angles, one twice as wide as the other. If you have a protractor, the larger angle is about 72 ([180/5]x2) degrees and the second is about 36 degrees (180/5), but usually I just eyeball it.

If you don't want to eyeball it, you can print a pattern from this page and cut it out as a guide.
Picture
Picture
Next, pull up the other corner. Fold right up against the other fold. (I'm not sure the best way to word that. Just look at the picture.)
Picture
If you care about the math, you now have two 36-ish degree angles.

Flip your paper over and fold it in half.
Picture
Picture
Cut off the top on the lines as shown, and you're ready to go! If you want ideas on designing a snowflake, take a look at my post with ideas and suggestions. Or just go crazy doing your own thing. That's OK too.
Picture
If you want to show us your cool 5 pointed snowflake, put a link in the comments!
3 Comments

Folding a 6 pointed snowflake

11/28/2014

1 Comment

 
Picture
(If you want, you can skip all my rambling by going down to the red text below.)

    I grew up cutting paper snowflakes to tape up on windows every winter. I started with the classic 6 pointed snowflake (since 4 and 8 points were just too easy), but eventually got bored with that, so I figured out how to fold the paper to make a 5 and 7 pointed snowflakes as well. I got good enough at it that I would frame and sell my finished snowflakes. After years of doing it, I think I've found a pretty good method of folding and cutting.

    I thought the internet would have it figured out too. However, that doesn't seem to be the case. Maybe I'm judgemental, but I just don't like most of the snowflake folding instructions I've found out there. So, I'm going to make my own set of instructions. I've never actually made instructions for anything before, so I may fail at making something better than what is already out there simply through inexperience. Photography is a big thing I need to figure out. Therefore, this will be a work in progress, and I may update it later if I find that there is a better way of doing it. Also when I learn to take better photos. Definitely.

    One of the reasons I'm dissatisfied with all the snowflake instructions I've found on the internet so far is that most of them tell you to start with a square piece of paper. Since I think 99% of the people following the instructions will use a 8 1/2 x 11 piece of printer paper, this just adds an unnecessary step to the process. Additionally, you end up with slightly less space to work with. Nothing huge, but I like taking advantage of as much paper as I can.

    In the picture below I folded a 6 pointed snowflake with a square piece of paper, and folded one with my own method. My method is the bottom piece. You can see, one folded my way will end up with a little bit more space. Again, not a huge deal, but I thought it was interesting.
Picture
    Snowflake folding takes several steps, so I'm going to make 4 separate posts--one each for 6, 5, and 7 pointed snowflakes, then one with some tips and ideas for designing your snowflakes.

So, without further ado...

HOW TO FOLD A 6 POINTED SNOWFLAKE:


Picture
Start with a regular ol' 8 1/2 x 11 piece of printer paper. You don't even need to make it a square.
Picture
Fold it in half, "hamburger style" as we'd say in elementary school, by bringing the two shorter sides together.
Picture
Picture
Now, you need to find the center point of the fold. Do this by bringing the two corners of the fold together and making a small crease right at the fold--YOU DON'T NEED TO FOLD THE PAPER ALL THE WAY ACROSS.
Picture
Picture
See the little crease?
Those previous steps are the same for any of the snowflakes you'll fold. With me so far?

Now, we get to things specific to a 6 pointed snowflake.

With a finger on the little crease you made, fold up one corner of your paper. You want to form two angles of the same size (congruent) with the edges of your paper. I usually just eyeball it, but if you have a protractor these will each be about 60 degrees (180/3). I say "about" because the thickness of the paper can throw it off a bit.

For some help finding the right angle, you can print and cut out a pattern here.
Picture
Picture
Now, fold the other side of the paper up, lining up the edge with the fold you just made.
Picture
Flip it over and fold it in half.
Picture
Picture
Cut it off on the line shown below.
Picture
Picture
And you're ready to go!


And, this is just an opinion, but... please, please, please, DO NOT USE A PATTERN. It is so much more fun to design your own snowflake, and you'll feel that much cooler when it turns out looking really awesome. It doesn't need to be complicated--some really cool looking snowflakes have really simple designs.

Have I convinced you yet?

I'll put together a post of tips and tricks for making designs if you want help thinking of things to cut.

If you feel ready to make your own designs without help, more power to you--go for it!

I'd love to see your favorite 6-pointed creations. Put a link in the comments.

Also, if you have any ideas or suggestions on making the directions clearer, or if you just spot a typo--let me know in the comments.
1 Comment

Easy Paper Turkey 

11/24/2014

0 Comments

 
Picture
The other day, I made this super simple little turkey and I thought I might as well let other people make it too. I cut this one out on my Cricut, but you can print the image below, cut out the pieces, and assemble it as shown. No glue necessary! If you make one, let me know in the comments. I'd love to see a picture!

Happy Thanksgiving!

turkeyprint.jpg
File Size: 88 kb
File Type: jpg
Download File

Picture
Picture
0 Comments

    Let me email you a Creativity Workbook full of fun drawing exercises:

    * indicates required
    Your email will not be shared with anyone. It will only be used for updates from me, and you can unsubscribe at any time.

    Want a Print?

    Take a look at my print shop on INPRNT.com

    Categories

    All
    Ambigrams
    Art
    Books
    Comic
    Craft
    Creativity
    Deep Thoughts
    Drawing Exercises
    Dummy Book
    Folding
    Goals
    Holiday
    Illustration
    Inktober
    Master Copy
    Painting
    Paper
    Personal
    Polyhedron
    Portrait
    Printable
    Progress Photos
    Snowflake
    Sourdough
    The Artist And The Engineer
    Whats Your Superpower?

    Archives

    September 2020
    March 2020
    January 2020
    December 2019
    July 2019
    June 2019
    March 2019
    February 2019
    January 2019
    October 2018
    September 2018
    August 2018
    June 2018
    May 2018
    April 2018
    March 2018
    December 2017
    November 2017
    September 2017
    August 2017
    June 2017
    April 2017
    February 2017
    January 2017
    December 2016
    November 2016
    October 2016
    May 2016
    April 2016
    March 2016
    February 2016
    December 2015
    November 2015
    October 2015
    September 2015
    August 2015
    July 2015
    June 2015
    May 2015
    April 2015
    March 2015
    February 2015
    January 2015
    December 2014
    November 2014

    RSS Feed

All content on this site was created by Sarah LuAnn Perkins. Do not use without permission.
Copyright © 2020
  • Portfolio
    • Picture Books
    • Covers
    • Middle Grade
    • Comics
    • Maps
    • Stand-alone images and prints
    • Cricut Cartridges
  • Art Classes
    • Drawing Fundamentals
    • Beginning Painting
  • Prints
  • About Me
  • Contact
  • Blog
    • Dummy Worksheets