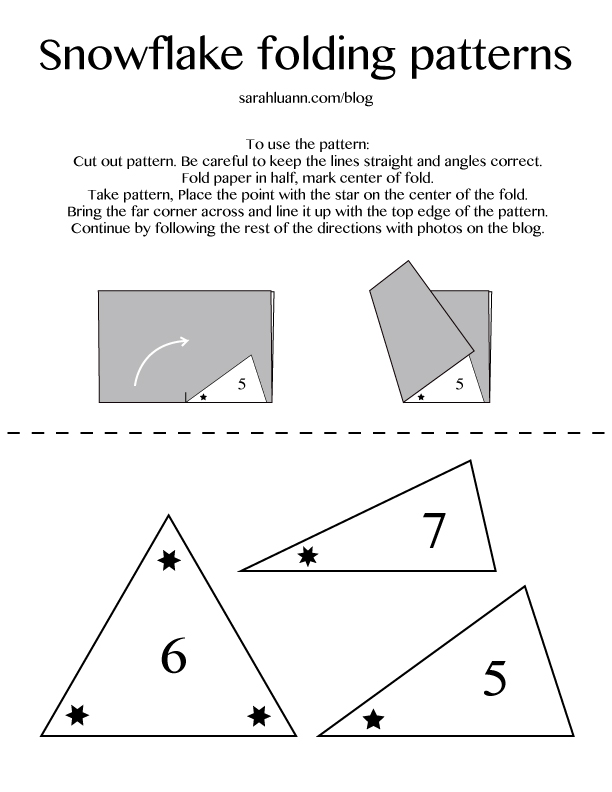
Today is our ward Christmas party, and the YW organization was in charge of decorations for the walls. We decided to decorate the walls with cut out starts. It might even have been my idea. To make it easier to teach people how to fold paper with the right angles, I made patterns to use as a guide. Though I've been folding paper snowflakes/stars for years without a pattern, I even found myself using the pattern, because it made things so much faster than just the guess-and-check method. Then I thought, why not make the patterns avaliable for everyone? Here they are: ![]()
2 Comments
Ok, you've folded your snowflake, either with 5 points , 6 points, or 7 points. Now what? Now you start cutting like crazy is what! Have fun and be creative! As I said before, I am NOT going to give you a snowflake pattern, because I believe that that would be getting in the way of your fun and creativity. Besides, if you wanted snowflakes designed by me, you could just buy the Holiday Snowflakes Cricut Cartridge. You're cutting snowflakes by hand--make it personal and unique! If you're still a little hesitant, here are some ideas of how to design a cool looking snowflake. This is most definitely not the only way--just one way. Use a pencil and draw LIGHTLY so its easier to erase from your final snowflake. I drew dark so you could see. Take your prepared little folded snowflake wedge shape and draw a few lines on it. I'd say somewhere from 2-5, but you can do more if you really like cutting. Straight lines are easier to cut, but curved shapes are fun too. Make sure they meet these criteria: -All the lines are somehow connected to the others -At least one of the lines touches each of the two folds That's it. Here are a few I did: Draw lines paralleling the ones you already made, to make a thicker shape. Cut along the outer lines until you've got your shape cut out. Open it up to see what you've created! Thats not the only way to make a cool snowflake. Here are some other things you might want to try: -Use the method above, but make the line widths vary--thick on one end and thin on the other, or maybe thick in the center and thin in the sides... lots of options! -Use the same criteria as above, but with shapes instead of lines. Try circles, squares, triangles, stars, whatever. -Remember, symmetry is your friend! Since we're working with folded paper, if you put the center of a symmetrical image on the fold, you'll get a whole one when you cut it out and open it up. Hearts, stars, snowmen, trees, leaves, people--so many symmetrical things! -If you want a challenge, try writing a word and cutting it out. The same criteria as above still apply--all the letters must connect (cursive can be helpful here) and your design must touch each of the folded edges at least once. I think its fun to play with the shapes created from the center of snowflakes you've already cut out. Look at the two snowflakes in this picture--the smaller one is made from the piece left behind when the center was cut out of the larger one. Fun, right? I also like having various sizes of snowflakes, which looks more interesting. Have other ideas or suggestions? Put them in the comments! Also, show us what cool snowflakes you made with these ideas.
You've folded one with 6 points, and you've folded one with 5 points. (No, really. Do those first.) Now, you want a 7 pointed snowflake! We'll start out just the same as we did for the other two. Fold your 8 1/2 x 11 paper in half. Find the center of the fold. Now we really get started. Fold up the corner of your paper and fold to form two angles, one 25.7 ISH degrees (180/7), and the other 77.1 ISH degrees ([180/7]x3)-- that is, the big angle is 3 times as wide as the small one. Not only do we have the thickness of the paper throwing our angles off, but you just have a whole lotta numbers after the decimals. You can print and cut out a pattern here if you want some help getting the right angles. Fold up the other corner against the edge of the fold you just made. Flip it over. Fold back along the edge of your last fold. (Again, not sure how to word this--look at the picture.) Flip it over and fold it in half. Cut off the top at the blue lines. Here are some ideas on designing snowflakes, if you're interested.
I'd love to see your cool 7 pointed snowflakes. If you want to show us what you've made, put a link in the comments! So, you've folded a 6 pointed snowflake, and you want to try something a little bit harder. (And really, I would suggest doing at least one 6 pointed snowflake before trying this one, because this one is just a tiny bit harder.) So, here we go--a 5 pointed snowflake. We start with the same few steps as the 6 pointed snowflake. Fold your 8 1/2 x 11 paper in half "hamburger style". Next, Find the center of the fold. Here's where it starts getting exciting. Fold up the corner of your paper (with the end of the fold at that little crease you made) to form two angles, one twice as wide as the other. If you have a protractor, the larger angle is about 72 ([180/5]x2) degrees and the second is about 36 degrees (180/5), but usually I just eyeball it. If you don't want to eyeball it, you can print a pattern from this page and cut it out as a guide. Next, pull up the other corner. Fold right up against the other fold. (I'm not sure the best way to word that. Just look at the picture.) If you care about the math, you now have two 36-ish degree angles. Flip your paper over and fold it in half. Cut off the top on the lines as shown, and you're ready to go! If you want ideas on designing a snowflake, take a look at my post with ideas and suggestions. Or just go crazy doing your own thing. That's OK too. If you want to show us your cool 5 pointed snowflake, put a link in the comments!
I thought the internet would have it figured out too. However, that doesn't seem to be the case. Maybe I'm judgemental, but I just don't like most of the snowflake folding instructions I've found out there. So, I'm going to make my own set of instructions. I've never actually made instructions for anything before, so I may fail at making something better than what is already out there simply through inexperience. Photography is a big thing I need to figure out. Therefore, this will be a work in progress, and I may update it later if I find that there is a better way of doing it. Also when I learn to take better photos. Definitely. One of the reasons I'm dissatisfied with all the snowflake instructions I've found on the internet so far is that most of them tell you to start with a square piece of paper. Since I think 99% of the people following the instructions will use a 8 1/2 x 11 piece of printer paper, this just adds an unnecessary step to the process. Additionally, you end up with slightly less space to work with. Nothing huge, but I like taking advantage of as much paper as I can. In the picture below I folded a 6 pointed snowflake with a square piece of paper, and folded one with my own method. My method is the bottom piece. You can see, one folded my way will end up with a little bit more space. Again, not a huge deal, but I thought it was interesting. Snowflake folding takes several steps, so I'm going to make 4 separate posts--one each for 6, 5, and 7 pointed snowflakes, then one with some tips and ideas for designing your snowflakes. So, without further ado... HOW TO FOLD A 6 POINTED SNOWFLAKE: |
Your email will not be shared with anyone. It will only be used for updates from me, and you can unsubscribe at any time.
Want a Print?
Take a look at my print shop on INPRNT.com Categories
All
Archives
September 2020
|